Monday, December 20, 2010

OIM–11G Installation Process


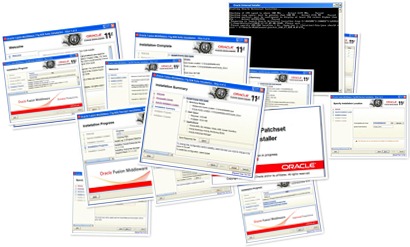
How to install Oracle Identity Management 11g (Click on Image and get all the Images in SLIDE SHOW)

1. Install Oracle 11g Database
2. Create Repository for OIM 11g Through Repository Creation Utility(RCU)        :-ofm_rcu_win32_11.1.1.3.3_disk1_1of1
3. Install Weblogic Server
4. Install Identity Management 11.1.2.0                 :-  ofm_idm_win_11.1.1.2.0_32_disk1_1of1
5. Overrite Identity Management 11.1.3.0              :-  ofm_idm_win_11.1.1.3.0_32_disk1_1of1
6. Install Identity And Access Management 11.1.1.3.0                      :- ofm_iam_generic_11.1.1.3.0_disk1_1of1
7. Install SOA Component                                  :- ofm_soa_generic_11.1.1.2.0_disk1_1of1
8. Overrite SOA Component                               :- ofm_soa_generic_11.1.1.3.0_disk1_1of1


Create Repository for OIM 11G/SOA Products. Through RCU.

Installation & Configuration of Weblogic 10.3.3 or 11G


Installation & Configuration of SOA 11G (11.1.2.0 and Update 11.1.3.0)

Installation & Configuration of Identity Manager 11G (Generic)

Map picture

Saturday, November 27, 2010

Installation of Oracle Identity Analytics 11g


Oracle Identity Analytics

· Oracle Identity Analytics formerly known as Sun Role Manager.

· Oracle Identity Analytics is software that provides a comprehensive role lifecycle management and identity compliance solution that enables companies to proactively enforce internal security control policies and automate critical identity management process.

Features  of Oracle Identity Analytics

1. Role-based access control and identity-based controls automation

2. 360-degree view of access data through multilevel attestation

3. Automated removal of unauthorized access through out-of-box integration with Oracle Identity Manager and Oracle Waveset.

4. Complete role lifecycle management

5. Preventive simulation and detective controls for segregation of duties

6. Compliance and operational dashboards

7. Identity Warehouse with business-friendly glossary

Oracle Identity Analytics Download Links :

http://www.oracle.com/technetwork/middleware/downloads/oid-11g-161194.html 

For Oracle Identity Analytics Installation :

Details:

a. Java JDK 1.6.0_21 (http://java.sun.com/javase/downloads/)

b. Tomcat Application Server6.0.29 (http://tomcat.apache.org/download-70.cgi)

c. MySQL 5.1 Database (http://dev.mysql.com/downloads/mysql/)

d. OIA Setup (http://www.oracle.com/technetwork/middleware/downloads/oid-11g-161194.html)

Installation Startup :

JAVA SETUP

1. Install Java JDK on your machine

2. Set PATH in your environment variables

PATH=%JAVA_HOME%;%PATH%;C:\Windows;C:\Windows\system32;C:\Program Files\Java\jdk1.6.0_21\bin

3. Set JAVA_HOME = C:\Program Files\Java\jdk1.6.0_21

4. Go to Command Prompt and java –version to verify everything is correct.

APPLICATION SERVER / WebServer SETUP (TOMCAT) / Glassfish

1. Unzip Tomcat. Unzip tomcat-6.0.28-preconfigured.zip into your C/D/E drive.

2. E.g. Location is : E:\apache-tomcat-6.0.29

3. Set CLASSPATH in your environment variables

CLASSPATH = .;C:\apache-tomcat-6.0.29\lib\servlet-api.jar;C:\apache-tomcat-6.0.29\lib\jsp-api.jar;C:\apache-tomcat-6.0.29\lib\el-api.jar;C:\Servlets+JSP;..;..\..
(for GlassFish its Not Required)

Test the Server: Go to E:\apache-tomcat-6.0.29\bin and click on startup –Serve r should be started.

5. Check http://localhost:8080

SETUP MYSQL DATABASE

1. Download the installation setup from the link provided above.

2. Typical Setup

3. Skip Sign-Up

4. Make sure "Configure the MySQL Server now" is checked

5. "Detailed Configuration"

6. "Developer Machine"

7. "Multifunctional Database"

8. "InnoDB Tablespace Settings" - leave everything default

9. "Decision Support (DSS)/OLAP"

10. Make sure "Enable TCP/IP Networking" is checked and leave the port number at 3306 (at this point, if you have a firewall, it will usually try to access itself on the localhost)
Leave "Enable Strict Mode" checked

11. "Standard Character Set"

12. Check "Install as Windows Service" and I would recommend leaving "Launch the MySQL Server automatically" checked.

13. Enter a root password (and remember/write it down) and I would recommend leaving "Enable root access from remote machines" unchecked

14. Then hit "execute" and it'll install and set it up.

SETUP ORACLE IDENTITY ANALYTICS

1. Create a folder E:\OIA and copy the download installation from the link above and extract it. It should look like below:

db / sample / conf / reports / legal / rbacx.war

This will be your RBACX_HOME, set the environment variable.

From sample folder, copy import and export directories and paste it to RBACX_HOME.

4. Setup database for OIA, use the schema script from RBACX_HOME\db folder.

For e.g. to load schema on mySQL database, use script named rbacx11.1.1.3.0_mysql_schema.sql

Go to mySQL folder on your drive through command prompt

mysql> \.rbacx-11.1.1.3.0_mysql_schema.sql

6. Go to RBACX_HOME\conf folder and copy jdbc.properties from folder of name of your db to conf folder.

For e.g in case of mysql, copy jdbc.properties file from RBACX_HOME\conf\mysql folder and paste it to conf folder.

Edit this properties file as per your database details. For instance, in case of mysql, replace $SERVER_NAME with host name of your database and port with 3306 (default for mysql)

Edit iam.properties file in RBACX_HOME\conf folder by replacing $RBACX_HOME with path of RBACX_HOME (so for our eg. it will be E:/OIA)


Extract rbacx.war from RBACX_HOME into temp folder.(e.g. C:\temp) [What we will do is to make some changes, add couple of jars and repack it again and deploy on server]

Now navigate to C:\temp\WEB-INF directory and edit below entry in log4j.properties file

log4j.appender.file.file=logs/rbacx.log (default)

log4j.appender.file.file=E:/OIA/logs/rbacx.log   :—After Change

Similarly make changes to conf-context.xml file in C:\temp\WEB-INF folder. Replace $RBACX_HOME with path of RBACX_HOME (According to Environment Variable setup)

Copy below jars to C:\temp\WEB-INF\lib folder

1. jasper-jdt.jar (http://dlc.sun.com/rolemanager/Certification_And_Reporting)

2. jdbc driver for your database(mysql drivers are already included in lib folder so no need to add them ) For Oracle it would be ojdbc5.jar or ojdbc6.jar

3. Jars for the connectivity of the provisioning server, you will integrate with OIA.

(If OIM is provisioning server then get jars from ext and lib folder of your OIM_HOME)

also can be downloadable from following link. http://dlc.sun.com/rolemanager/Provisioning_Server_Connectivity

10: Pack the folder C:\temp

C:\> cd C:\temp

C:\> jar -cvfm rbacx.war . (Create Ware File) from command prompt.

Use this war to deploy on your application server. Copy or deployee rbacx.war in WebApps folder of Tomcat and start the server.

Start the server and access the console using url

http://hostname:port/rbacx/ Here ( http://localhost:8080/rbacx ) and will get following screen

Default user name is rbacxadmin and password is password

 
MY VM-SCREEN

image[5]

 Oracle Identity Analytics. Integrated with OIM 

Friday, September 3, 2010

NEW CHNAGES IN OAM 11g Product

Oracle Access Manager (OAM) : is Access Management Product acquired from Oblix in 2005.

  • Oblix COREid (6, 7) and OAM 10g is written in C++where as OAM 11g is J2EE application deployed on Oracle WebLogic Server (10.3.3+)
  • There are two main OAM components in OAM 10g, Access System(Access Server, WebGate and Policy Manager) and Identity System (Identity Server and WebPass). In OAM 11g there is NOIdentity System Component“. Identity related functions are moved to Oracle Identity Manager(OIM) 11g. (OIM is user provisioning and reconciliation product acquired from Thor Xellerate)
  • There is NO identityXML interface or Workflow in OAM 11g.
  • Access Server in 10g is now called as OAM Server in 11g
  • Policy Manager in 10g is now called as OAM Administration Console in 11g
  • AccesssGate and WebGate in 10g are now called as OAM Agents in 11g
  • Directory Profiles in 10g are now called as User-Identity Store in 11g
  • In OAM 10g configurations are stored in LDAP servers where as in OAM 11g configurations are stored in xml file (under webloigic domain) - $DOMAIN_HOME/config/fmwconfig/oam-config.xml
  • In OAM 10g Policies are stored in LDAP server where as in OAM 11g you have option to store them either in XML file or in Database.
  • In OAM 10g Sessions used to be stateless where as in OAM 11g, user sessions are stateful and stored on Server in OAM 11g (It is possible to leverage Coherence for distributed caching of session data). For more information on Oracle Coherence (earlier Tangosol) click here
  • In OAM 11g (by default) Policy Data & User session datais stored in single database (details under $DOMAIN_HOME/config/jdbc/oam-db-jdbc.xml) under one schema however it is possible to configure OAM Policy Data in to one database and user session data in another database. 
  • OAM Server (Access Server in 10g) in OAM 11g is deployed on WebLogic Managed Server (oam_server1 - default port 14100)
  • In OAM 11g, OAM Administration Console(Policy Manager in 10g) is deployed on WebLogic Admin Server (default port 7001)
  • URL for OAM Administration Console is http://server:7001/oamconsole (default username/password created during domain creation in weblogic)
  • OAM 11g User Interface (UI) is based on Application Development Framework (ADF)
  • Three type of Web Agents are supported in OAM 11g -
    a) AccessGate/WebGate from 11g
    b) AccessGate/WebGate from 10g (for backward compatibility) and
    c) mod_osso for Oracle 10g Single Sign-On integration


Some Screenshots About OIM – 11g Product

image

ORACLE IDM - (Oracle-SUN)

image

image

image

image

First PHASE Achievement through OIM 11g

image

image

image

image

image

image

image

image

image

image


Tanweer Ahmad

Wednesday, July 28, 2010

OPEN SSO 8.1 Update 5 Integration with Sun IDM 8.1 update 2

Will post in next 24 Hour

Concept Behind Open SSO

1. Open SSO 8.1 Update 5
2. Sun IDM 8.1 Update 2
3. MySQL or Oracle Waveset
4. LDAP (Sun One Directory Server)
5. SSO
6. Proxy setting for Application Server (Glassfish) Through Sun One Web Server

Tanweer

Friday, June 18, 2010

Some Technology Conference (Oracle / Google / Sun)

Google I/O 2010 - Customizing Google Apps


Java One - Larry Ellison on Oracle's Java Strategy


PARTE 1 - Oracle Identity Analytics

PARTE 2 - Oracle Identity Analytics

PARTE 3 - Oracle Identity Analytics

Installing OpenAM / OpenSSO Release 9 on Tomcat 6.0.26 on Windows 7

Creating a virtual machine on VMware Server & ALl About Windows 2003 Server (Installation / Configuration/ Domain Controller / Group Policies And So many )

Creating a virtual machine in VMware is a straightforward process once VMware server is up and running. to learn how to setup a VMware server check my previous post on how to setup a testing network using VMware server. Today we will setup a virtual machine in VMware console to host our Windows Server 2003 for our testing network domain controller.

Once you’re logged in on your VMware server console, you should be able to see the following screen:

1

On your left hand top corner click on Create Virtual Machines, and the following window should pop up:

2

Choose a descriptive name for your virtual machine, in our case is “Windows Server 2003″ leave the Datastore as [standard] and click next.

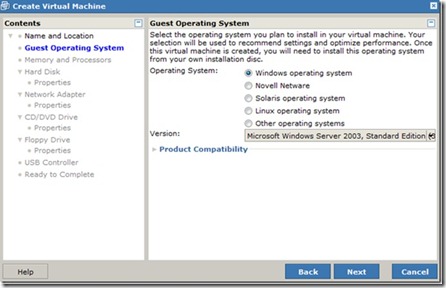
On the following screen you will be asked to choose your guest operating system:
3

Choose a descriptive name for your virtual machine, in our case is “Windows Server 2003″ leave the Datastore as [standard] and click next. On the following screen you will be asked to choose your guest operating system.
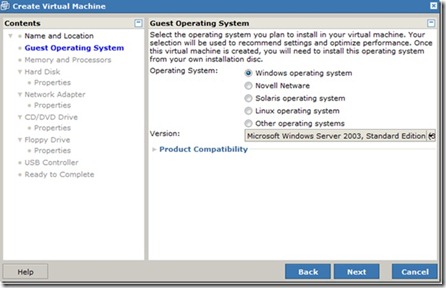
4

Select your desired operating system installation, in our case is Microsoft windows Server 2003 Standard Edition. Click Next. The next screen is important. in this screen you need to select the amount of memory you want to allocate for the virtual machine:

5

For this virtual machine I have allocated 384 MB and chosen 1 processor for the system. remember that these settings impact the performance of your physical machine as well as the virtual machine, so choose them carefully. On the next screen, you will need to create the size of the virtual disk the virtual machine will use:

6

Click on Create a New Virtual Disk and the following screen will show up:

7

We will make the hard drive size of 10 GB for Windows Server 2003. for our network testing purposes that should be enough.for location, leave the default one. click next.

On the next screen, we will need to select the network adapter:
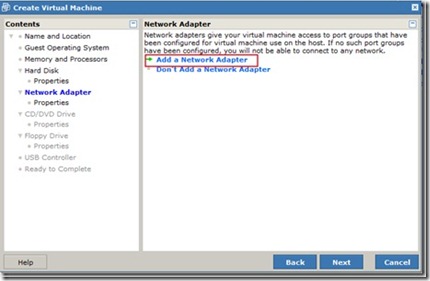
8

Click on Add Network Adapter and the following window will show up:

9

Select which network adapter your virtual machine will use. when you install VMware server it creates some bridged virtual network adapters on your physical machine, choose Bridged and click next.

Next, we will need to select which CD/DVD drive for our virtual machine will use:

10

Click on Use a Physical Drive, and the following windows will show up:

11

Choose the physical drive letter of your computer, in this case is drive letter E: make sure the “Connect at Power on” option is checked.

Next, we need to choose if we need a Floppy drive for our virtual machine. I won’t use a floppy drive on this virtual machine so:

12

Click on Don’t add a Floppy Drive and click next:

On the next screen, we will need to choose if we want to have access to the USB controller in the host machine. I think this should be useful:

13

Choose Add USB Controller and click next.  Next you will get the summary of the settings of your virtual machine:

14

At this point, the creation of our virtual machine is ready to complete. clicking on Finish. the setup now should be completed!

Now, the name of of your virtual machine should appear on the right hand top corner on VMware console indicating the virtual machine has been created. now you are ready to begin the server 2003 installation.

15

Now, if you click on the Console tab, it should bring you to the virtual machine installation process, but if you installed VMware server the way I did, you most likely will encounter this error:

16

_________________________________________________________________________________________________________________________________________________________________

In the Above post we troubleshot a small issue when opening the virtual machine through the console.

We can read the post here “error opening the remote virtual machine” Now i am going to install windows server 2003 in that virtual machine to setup the domain controller in testing network. Once you login to the VMware server console, you should be able to see the virtual machine in the right top corner we created in a previous post, you can read the post here “creating a virtual machine on a VMware server”

17

Click on the “Windows Server 2003″ virtual machine, and then click on the console tab:

VMware console

Then click on the white arrow to turn on the virtual machine on. once you have turned the virtual machine on, the Windows Server 2003 installation wizard should come up:
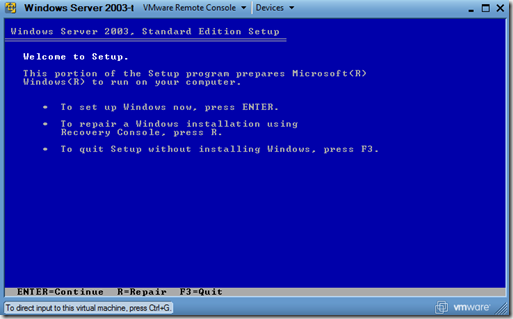
Windows Server 2003 server installation

Make sure the Windows Server 2003 CD is inserted in the CD-ROM and press ENTER to continue the installation of Windows Server 2003.

The Windows License agreement will come up next, press F8 to accept the agreement.

Next, the setup will ask you where you want to install the server, and the 10 GB of un-partitioned space will show up:
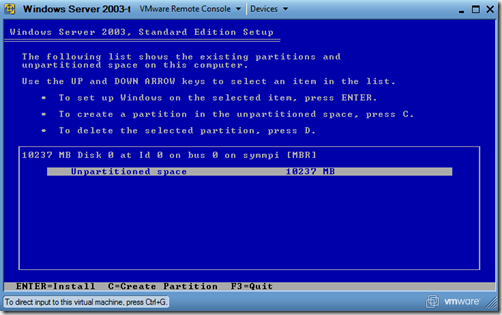
Windows Server 2003 unpartitioned space

Press “Enter” to continue the install.  In the following window, you need to format the drive with NTFS file system:
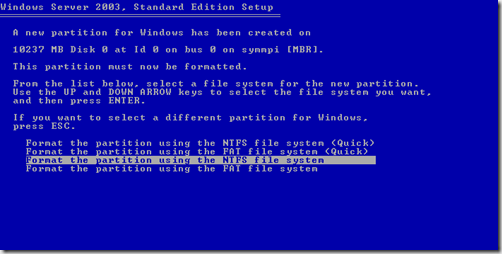
Format the drive

The formatting should start. quick after, setup will start copying the system files to the hard drive:
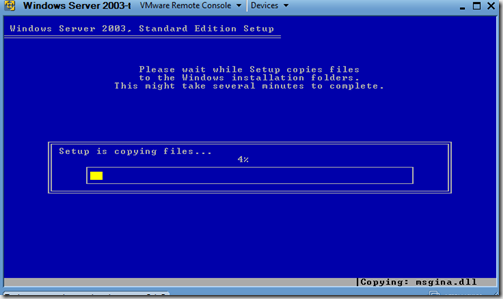
Copying files to the hard drive

That will take awhile. Then the computer will restart. The Windows Server 2003 setup will continue.
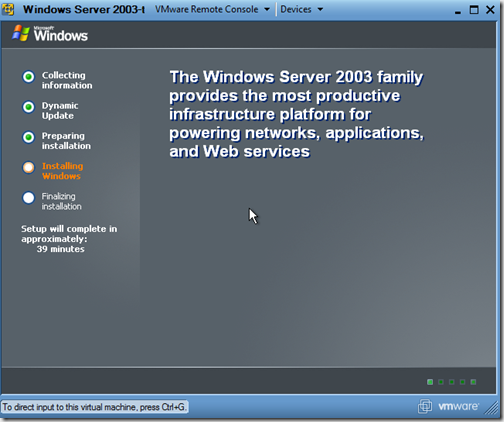
image

Next, the regional and language settings will come up:
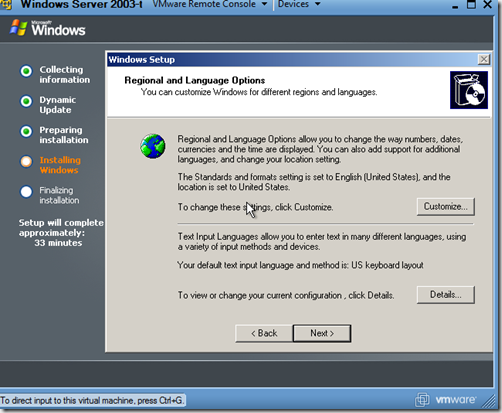
regional and language options

Next, choose the name and organization.  Next you will need to Enter the product key. if you downloaded Windows Server 2003 from the Internet, make sure the Product key was included.

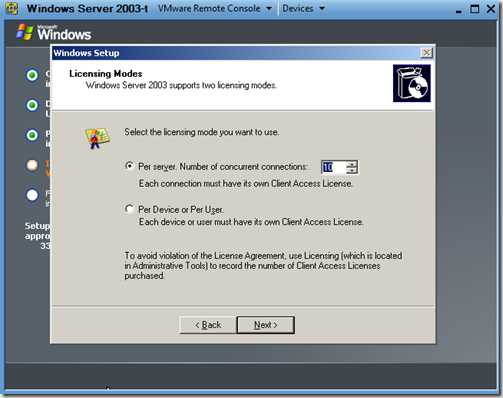
After you have entered the product key, click next. On the next window, you need to choose between per server or device mode. Choose per server mode, and increase the concurrent connections to 10:
License mode

Click Next. On the next window, name the computer, and choose an administrator password.

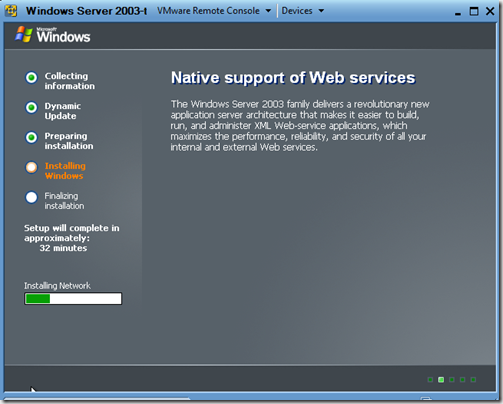
Click next.  On the next screen, you need to specify the time and time zone you are at.  And that will be the information windows 2003 server will   need for now, the installation should continue:
Final installation phase

Next, Windows setup will ask you for network settings. choose typical and click next. Next, setup will ask you if you want to join a domain or leave it as workgroup. leave as Workgroup because later we will make this computer a domain controller. click next.

Setup should continue.  The installation of Windows Server 2003 should now be completed.

How To Install Windows 2003 Server Quick & Simple

Windows Server 2003 VMWare Install Tutorial

How To Install Windows 2003 Active Directory

How To Add a New Computer to Windows 2003 Server Domain

How To Add a Group To Windows 2003 Server Domain

How To Add a Group Policy in Windows 2003 Active Directory

Windows Server 2003 - File Server & Shadow Copy

How to Recover an Active Directory object