Monday, April 27, 2009

How to Create Development environment for Sun IDM 8.1 with NET BEANS

PrerequisitesThe following items must be completed before starting this tutorial.

•Workstation with 2 GB RAM and 1 GB free disk space
•Access to the internet to download the required installation files
•Java Development Kit (JDK) version 1.5 or version 6 installed
Sun IDM War File

Installatio of IDM with Repository


Saturday, April 25, 2009

Use this wizard to create a new Exchange ActiveSync mailbox policy


Enter a name for the policy that you're creating.

Now use the checkboxes to control the device's password policy, and whether or not you want attachments to be downloaded to the device. There is also checkbox you can use to let Exchange 2007 know that you have non-provisionable devices.

Click the New button and the new ActiveSync mailbox policy will be created.

Click Finish to close the completion summary screen.

Step 4: Creating users and mailboxes to complete the ActiveSync configuration

The final step is to assign the ActiveSync mailbox policy to the users. The problem is that, because this is a brand new Exchange Server deployment, there really aren't any users yet. So let's jump ahead and learn how to create some users and mailboxes so that we can finish the ActiveSync configuration.


Begin the process by creating a few user accounts through the Active Directory Users and Computers (ADUC) console in the same way that you normally would.

After you've created a few user accounts, go back to the Exchange Management Console and select the Recipient Configuration container.

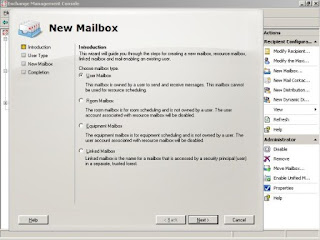
Now click the New Mailbox link found in the Actions pane to launch the New Mailbox wizard shown in Figure

Configuring ActiveSync


Step 1: Configuring the Microsoft-Server-ActiveSync virtual directory

The first step in the ActiveSync configuration process is to install an SSL certificate on each client access server that hosts the Microsoft-Server-ActiveSync virtual directory. For the purposes of this tutorial, I'm assuming that you've already acquired an SSL certificate for use with your Exchange 2007 server. You must now configure the Microsoft-Server-ActiveSync virtual directory to require SSL encryption.


Begin by selecting the Internet Information Services (IIS) Manager command from the Windows Administrative Tools menu.

When the IIS Manager console opens, navigate to the Web Sites -> Default Web Site -> Microsoft-Server-ActiveSync container.

Right click on the Microsoft-Server-ActiveSync container and select Properties.

Go to the Directory Security tab and click the Edit button found in the Secure Communications section.

Select the Require secure channel (SSL) checkbox and click OK to complete the process.

Step 2: Adjusting firewall settings for ActiveSync

The next step in configuring ActiveSync is to adjust the firewall settings to allow ActiveSync to use Direct Push. The actual procedure for doing so will vary depending on your firewall. What I can tell you is that if you have the Client Access Server role and the Mailbox Server role installed on two separate Exchange servers, you will need to open TCP port 135 on any firewall that might exist between the two servers. This will allow the RPC Locator service to communicate between the two servers.

Since you're requiring SSL encryption for the Microsoft-Server-ActiveSync virtual directory, you must open TCP port 443 on any firewall standing between the Internet and that the Exchange server on which the Client Access server role is installed.

In addition to opening these ports, Microsoft recommends that you set your firewall's timeout period to 30 minutes. Shorter timeout periods will cause mobile devices to initiate new HTTPS requests on a more frequent basis. These requests not only consume bandwidth, but they also shortened battery life on mobile devices.

Step 3: Creating an Exchange ActiveSync mailbox policy

The third step is to create an Exchange ActiveSync mailbox policy.


Open the Exchange Management Console and select the Client Access container to view the details pane, where any existing ActiveSync mailbox policies will be listed (there shouldn't be any, since this is a new server).

Click the New Exchange ActiveSync Mailbox Policy link found in the Actions pane to activate the New Exchange ActiveSync Mailbox Policy wizard.

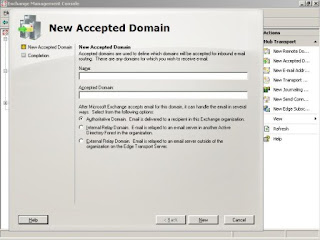
Specify a domain with the New Accepted Domain wizard.


Enter a description of the domain into the Name field, and then enter the domain name into the Accepted Domain field. Finally, use the radio buttons at the bottom of the screen to choose whether the domain is authoritative, an internal relay domain, or an external relay domain.

When you click New, the wizard will add the accepted domain to the Exchange Server organization. But first make sure you check your domain's spelling before clicking the New button -- the wizard does not give you an "are you sure" message.

After the domain has been added, click the Finish button to close the wizard.

Configuring domains for which you will accept email


Assuming that your Exchange 2007 server contains the Hub Transport role, you will need to define at least one accepted domain for the Exchange Server organization. An accepted domain is any domain namespace for which the Exchange server can send and receive SMTP email. In most cases, the Exchange server is considered to be authoritative for accepted domains, but accepted domains can include both authoritative domains and relay domains.

By default, the fully qualified domain name (FQDN) of your forest's root domain is defined as an accepted domain for the Exchange Server organization. Having this default-accepted domain entry will make it possible to send email back and forth locally. But in the real world, you probably want to define other authoritative domains for your organization, such as external SMTP domains.

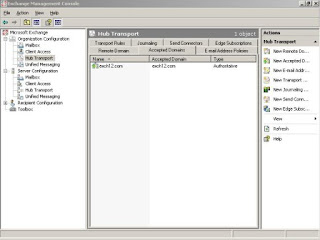
To define the Exchange Server 2007 organization's accepted domains, navigate through the console tree to Microsoft Exchange -> Organization Configuration -> Hub Transport.

When you select the Hub Transport container, the console's details pane will display the hub transport's properties sheet. Select the Accepted Domains tab. As you can see in Figure 9, the local domain name should already be listed.

Verifying Exchange 2007 deployment


The easiest way to tell if Exchange Server 2007 was deployed correctly is to select the Server Configuration container in the Exchange Management Console. When you expand this container, you'll see a list of the various roles that are installed on the server appear just below the container, as shown in Figure


Part 4: Exchange Server 2007 post-deployment configuration tasks


In Part 3, we walked through the Exchange Server 2007 installation process. But before Exchange 2007 is ready to use, we must complete some post-deployment configuration tasks. As I walk you through these configuration tasks, keep in mind that you may have to perform a different set of tasks than the ones that I am writing about -- it all depends on the roles that you selected for your Exchange 2007 server.

Having to do some configuration tasks after the initial installation is nothing new for Microsoft products. What is new is that the Exchange Management Console (formerly known as the Exchange System Manager) actually walks you through the configuration process. If you select the console's Microsoft Exchange node, you'll see a screen similar to the one that's shown in Figure


MS EXCHANGE - 7


When the installation process completes, the Exchange Management Console (formerly known as Exchange System Manager) will open and you will be prompted to begin the final configuration process, which I outline in the next segment of this tutorial.


MS EXCHANGE - 6


Now click the Install button and Exchange 2007 Setup will begin installing the necessary files and configuring the selected roles. As you can see in below Figure , the installation process took about 20 minutes to complete on my test server.

MS EXCHANGE - 5


Click Next again and Setup will run a readiness check against the server and the forest as a whole. The readiness check itself doesn't take long, but be prepared to spend a little time cleaning up the issues that the readiness check reveals. On my test deployment, there were a couple of Windows patches that Setup required me to download and install before it could continue. When the readiness checks complete, the results look something like what you can see in Figure

MS EXCHANGE - 4


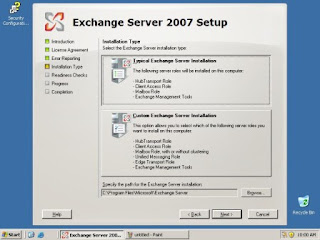
Click Next and you will see the screen shown in Figure 3. This screen asks you if you want to perform a typical or custom Exchange Server installation. While asking about custom installations isn't new to Microsoft products, the way that Exchange Server 2007 goes about the process is new.

Notice that there are a number of Exchange Server 2007 server roles listed below each installation type. Server roles are a big new concept in Exchange Server 2007. The roles that you select control the server's capabilities and what services and dependencies are installed. I will be talking a lot more about roles in future articles. For now though, select the "Typical" Exchange Server Installation option and then click Next.

Enter a name for the Exchange Server organization and click Next. The default organization name is "First Organization," which is what I will be using for the purposes of this tutorial. In Exchange Server 2003, choosing an organization name was a big deal because it could not be changed later on. I'm honestly not sure if this has changed in Exchange 2007 or not, but choose your name carefully just in case.

Click Next and Setup will ask you if you have any client computers running Outlook 2003 or earlier versions of Microsoft Outlook. When answering this question, think about not only if there are Outlook 2003 clients now, but whether there will ever be any Outlook 2003 clients. Since I am using Outlook 2007 on a test network, I answered "No" to this question.

MS EXCHANGE - 3


Step 4: Install Microsoft Exchange

Now it's time to install Exchange Server 2007 itself:
Click on the "Install Microsoft Exchange" link to view the screen shown in Figure

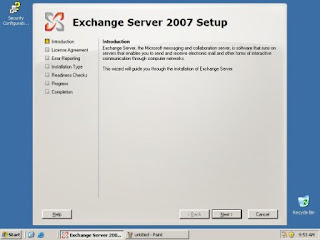
Click Next to bypass the wizard's Welcome screen and view the End User License Agreement. Accept the license agreement and click Next.

You will now see a screen asking if you would like to enable error reporting. If you enable error reporting, information about errors that occur will be silently transmitted to Microsoft over an encrypted connection. Whether or not you enable error reporting is up to you, but for beta testing purposes, I highly recommend enabling it.

Step-by-Step Guide: Test driving Exchange Server 2007 - 2 - SCREEN SHOTS


The Exchange Server 2007 installation process

To begin the Exchange Server 2007 installation process, I downloaded the current Exchange Server 2007 beta from the Microsoft Web site. I then double-clicked on the file that I downloaded to extract the Exchange Server 2007 setup files.

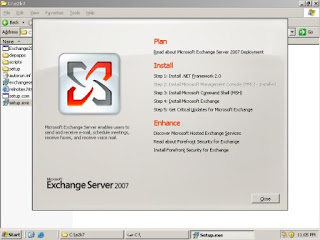
To install Exchange Server 2007, double-click on the Setup.exe file to see the splash screen shown in Figure


As you can see, there are five steps to installing Exchange Server 2007: installing the .NET Framework, installing the Microsoft Management Console, installing the Microsoft Command Shell, installing Exchange Server, and downloading any available updates.

Step 1: Install the .NET Framework 2.0

The first step in the Exchange Server 2007 installation process is to install version 2.0 of the .NET Framework. The installer makes it look like the .NET Framework will be installed as a part of the Setup process. However, when you click on the Install .NET Framework 2.0 link, you are taken to a Web page where you can download the .NET Framework 2.0.

The .NET Framework is only 45.2 MB in size, so the download shouldn't be a big deal. One thing that you do have to pay attention to though is the fact that there are 32-bit and 64-bit versions. Make sure you download the 64-bit version of the .NET Framework 2.0
Step 2: Install the Microsoft Management Console

Exchange Server 2007 requires version 3.0 of the Microsoft Management Console (MMC). The new management console differs from the previous version in that it supports three horizontal panes, as opposed to the two panes that the previous version was limited to. MMC 3.0 also supports an extra vertical pane. These extra panes don't show up if you simply enter the MMC command at the Run prompt, but the new Exchange System Manager -- now called the Exchange Management Console -- makes use of them.

In Figure 1 above, the option to install Microsoft Management Console was grayed out on my test machine. This is because MMC 3.0 was installed by default with Windows Server 2003 R2 SP1.

Step 3: Install Microsoft Command Shell

As tidbits of information about Exchange Server 2007 and Windows Server Longhorn have leaked out, you might have heard about Monad. Not too long ago, Microsoft renamed Monad to Microsoft Command Shell; it is a scripting language that will be native to Longhorn Server.

Exchange Server 2007 is written in such a way that anything that can be done through the Exchange Management Console can also be scripted through the Microsoft Command Shell. In fact, I have heard rumors that the new Exchange System Manager was written on top of the Microsoft Command Shell.

At any rate, the Microsoft Command Shell is a required component. Like the .NET Framework, you will be prompted to download the Microsoft Command Shell as part of the Exchange Server 2007 installation process.

IN NEXT POST REST INSTALLATION


Step-by-Step Guide: Test driving Exchange Server 2007 - 1

In this tutorial, I will help you prepare for your own Exchange 2007 beta testing or Exchange 2007 migration by introducing you to the newest versions of Exchange Server and Microsoft Outlook. That will support in Identity Management Exchange Provisioning (Environment creation for the Email)

part 1: Exchange Server 2007 installation requirements

Exchange Server 2007 hardware requirements

Exchange Server 2007 requires a server with a 64-bit processor and a 64-bit operating system. It supports a variety of 64-bit processors, including Intel Xeon or Pentium processors that support Intel Extended Memory 64 technology (EM64T). 64-bit AMD Opteron and Athlon processors are also supported. Exchange 2007 will not run on the Intel Itanium (IA64) processor though.

I'm not sure if these other hardware requirements are official yet or not, but the information that I got from Microsoft was that Exchange Server 2007 will require a minimum of 1 GB of RAM (2 GB recommended) and a minimum of 1.2 GB of hard disk space.


While I am on the subject of hard drives, I should mention that all partitions must be formatted as NTFS. This includes the system partition and partitions containing Exchange Server binaries, transaction logs, database files, and any other Exchange-related files.

Exchange Server 2007 operating system requirements

Internet Information Server

The server on which you install Exchange Server 2007 must be running Internet Information Server (IIS). What is different from deploying Exchange Server 2003 though is that only the minimal IIS components should be installed. For example, you cannot install Exchange 2007 if the SMTP or NNTP components of IIS are installed.

Exchange Server 2007 infrastructure requirements

There are some fairly stringent requirements for the network that your Exchange 2007 server is connected to. For starters, the Active Directory domain functional level must be set to Windows 2000 or higher.

Furthermore, the domain controller that is acting as the schema master must be running Windows Server 2003. By default, the Schema Master role is assigned to the first domain controller in the domain, but you can move the role to another server if necessary.

In addition, all domain controllers and global catalog servers running in the Exchange 2007 site must be running Windows Server 2003.

The test environment used for this Exchange Server


Before I get started with the deployment process, I want to tell you a little bit about the test environment I used for this "Exchange 2007 test drive." Knowing exactly how my environment is configured may help you out if you try to duplicate any of the techniques I discuss.

For the purpose of the demonstrations herein, I am testing Exchange Server 2007 on an AMD Athlon 64x2 3400+ with 2 GB of RAM. It is running Windows Server 2003 R2 Enterprise x64 Edition with Service Pack 1.

Also, because Exchange Server modifies the Active Directory schema, I created a dedicated forest solely for the purpose of beta testing Exchange Server 2007. I did not want Exchange 2007 Beta 2 making any modifications to the schema of my production Active Directory database.

In addition to the machine that is running Exchange Server 2007, there are three other computers in my dedicated forest. One machine is running a beta of Longhorn Server, and is acting as a domain controller and the DNS server for the forest's only domain.

The other two computers in the forest are workstations. They are both running a beta of Windows Vista, and the copy of Microsoft Office 2007. Later in this tutorial, I use these two PCs to demonstrate using Microsoft Outlook 2007 in an Exchange Server 2007 environment.

Or you can Use VMWare - So that You can Create 2 Diffrent Environment ( Opearting Systems)

Friday, April 24, 2009

OPEN SSO - solaris

How IDM Will Work -

Here in this Video you can see How idm will work through Identity Manager, Access Control and Resources and process Provisioning, Thsi video is based on Oracle, but the Archetecture is Same wth Sun IDM and OIM also,


In this Video you can find that how Identity Manager will work, with Account, Resources, Access Control and Virtual Directory.

Data Loading & Synchronization

The Most Important Topic of the Any Identity Management Products

You find this details alsoin the 7th Chanpter of the Sun Identity Manager Document on Business Administration Guide. & the 3rd Chapter of the Sun Identity management Depolyement Guide

Now i am explaining you why its So important.

When Account has to linked with User, it either Synchronize the Data or create a new Accounts in the IDM or Resources,

Here User and Account are 2 Diffrent things --

User is a Virtual Identity that is managed by Identity Manager &
Account that is permanent and which is managed by Resources, so that one User can have n-Number of Accounts.

SO that Identity manager contains individual Account ID and Resources ID, Identiy Manager having Account and resource indormation in Accout Index form and Evrey Account Index contains Account ID and Resource ID, this Index also contains the some more information about the Account like Who is teh Owner of the account, What is the account status ( Enabled / Disabled)
This Topics contains information like
Types of Data Loading / How tha Data Should Load with diffrent Types of Loading / managing Reconciliation and Active Sync
Dataloading.
Data Loading is the process importing account Information from the resource into IDM and after that assign these accounts to the IDM USER.
IDM Will support 3 main feature which laod the account data information from resource
1. Discovery / 2. reconciliation / 3. Active Sync